This is the second post in a multi-part series on Load Development. Here is Part 2 Setting Standards.
Setting Standards
If you are asking why set a standard? Well, if you don't set a standard, or a goal, then there isn't much point in going through this whole process of developing a load. No matter what your goal, you should set a standard, and make sure you conform to it. This will make reloading easier and more fun, it will also make shooting more fun and hopefully reduce stress at matches when you could be worried about how your ammo is going to perform.
So what goes into a standard? Well, the first thing you should do is decide what you want the ammunition to do. At the same time you should remember that every decision is a trade off, and the number of decisions you get to make every time you make one shrinks exponentially. If your goal is creating a round that uses the cheapest bullet, cheapest powder, has the lowest charge volume, gives phenomenal accuracy, insanely high muzzle velocity, and has zero recoil that's great. Send me a message when you've achieved this, I've been trying for nearly 20 years and have never even come close.
The first thing you should decide is what the basic requirements are for your cartridge. Let me illustrate this with an example, .223 Remington. A good goal: "I want it to cycle my AR-15 without issue" Sounds easy right? Well this immediately limits you to medium burning powders such as H332, Varget, AA2230, TAC, and eschews fast burning powders like IMR4198, IMR4227 and the like. The next goal should be either your accuracy or muzzle velocity. Most frequently the most accurate loads are not the ones pushing maximum velocity, in fact quite far from it. So this is a fork in the road. Since you clearly want to fire this cartridge out of a semi-automatic rifle, you are bound by a certain max over-all length of the cartridge, in this case 2.260" but it works best when loaded to 2.250" or less.
So lets pick an accuracy load, in my opinion, life is too short to miss, and missing is much more affordable when shooting a .22LR than a high powered rifle.
I also want to shoot at medium to long ranges, so I want a bullet that's heavier and more streamlined than the short FMJ-BT bullets that are so cheap, the Sierra 69gr Match-King is a great bullet, but the 60gr SMK, and 55gr SMKs are also great choices for certain applications, like if I was shooting with a carbine length barrel instead of a rifle length barrel.
So lets browse through the available loads, here are a few from data.hodgdon.com:
69 GR. CFE 223 2.235" 23.5 2788 25.8 3029 54,600 PSI
69 GR. Varget 2.235" 24.0 2784 26.0C 3010 50,200 CUP
69 GR. IMR 4320 2.235" 23.0 2673 24.8 2873 53,100 PSI
69 GR. IMR 4064 2.235" 22.5 2690 24.0C 2872 50,900 PSI
So it seems I can expect a muzzle velocity out of my 20" gun up to around 3000FPS. Now like I said earlier, the fastest load will not always be the most accurate, so 3000FPS is going to be the upper limit of how fast I'm expecting this bullet to go. The next consideration is the minimum velocity I'm willing to tolerate. After doing a little bit of checking, the 69gr SMK has a BC that averages about .305, so using an online ballistic calculator, if I load to a minimum velocity of around 2700FPS, I can expect the bullet to be transonic as the bullet approaches 800 yards, however if I can keep the muzzle velocity to around 2850FPS the bullet will still be marginally supersonic at 800 yards, giving this round an accurate range out to this distance. So now I have an upper and lower bound.
In a home situation, now would be a good time to pick out a powder, usually the starting point for this, is "what do I have?" otherwise it is now time to make a shopping run and go buy some powders. If you have experience and certain favorites for this, by all means use that. One of my personal favorite powders is Varget, which conveniently is shown above. However, for completeness, I like to choose at least one other powder I think may work well, this may be because a different powder is more available, it meters better, or any number of other reasons. A common powder for .223 Rem is H335, I have a lot of it around, so I will add that to the spec.
So now I have created a rough specification for my cartridge:
Caliber: .223 Remington
Powder: Varget, H335
Charge Wt. 24-26, 22-24
OAL: 2.235-2.250"
Velocity: 2850-3000FPS
Now it's time to load some test cartridges, which will be the next installment.
Monday, March 26, 2012

Saturday, March 24, 2012
Load Development
Load Dev is probably one of the biggest "black arts" of making ammunition, but once it can be understood as a process, much of the art fades to science. While some of the initial data that goes into load creation is largely due to experience and intuition there are great many ways you can back up a gut feeling with science. I will do my best to tear away the shrouds in this post.
Since this is a very complex topic I'm going to be breaking it up into multiple posts. Here is Part 1: Tools
Tools
When everyone first gets into reloading, they spend a lot of time buying tools, constantly finding they need this gizmo, or that whiz-bang, and in general they will make more than a few runs to the sporting goods store to pick up the next thing they never knew they needed. Having the right tools to understand what ammunition is doing when you fire it is an essential part of load development. So what are the tools?
The primary tools needed for load development are those that measure, whether you're trying to squeeze the most accuracy, the highest muzzle velocity, (or lowest in some cases) having the right tools is an essential part. If you are reading this post, you probably already have one of those essential tools: A computer. Computers are very handy for their ability to quickly and easily make complex calculations on large amounts of data. I highly recommend having a spreadsheet type program, like Microsoft Excel, or OpenOffice's Calc application, both have a similar look and feel.
The next necessary tool is a good chronograph, there are many different ones on the market with all kinds of options, under most circumstances, if you have a pen and paper, you don't need the type with the memory and built in calculators and the like, you just need one of the basic ones that when a shot goes over it, it gives you the velocity in your favorite units (I recommend Feet per Second, as it's a little more granular than M/s but it's all a matter of tolerance in the long run).
You will also need some targets, any kind of targets will do, most people use a calibrated target that will have 1" grid squares on it, or something similar. For certain purposes I have a set of transparencies which have group size circles on them, so I can determine if a particular group is 1 MOA, 2 MOA, etc.
Clearly, you will need a firearm that chambers and fires the particular round you are conducting the experiment for, preferably one with repeatable sights, and reasonable accuracy. (Most modern firearms have excellent accuracy)
Some other measuring tools are usually handy to have too, a set of calipers for measuring OAL and group size. A magnifying glass, a tablet and a pen for writing down numbers, sometimes a scientific calculator is handy too.
Since this is a very complex topic I'm going to be breaking it up into multiple posts. Here is Part 1: Tools
Tools
When everyone first gets into reloading, they spend a lot of time buying tools, constantly finding they need this gizmo, or that whiz-bang, and in general they will make more than a few runs to the sporting goods store to pick up the next thing they never knew they needed. Having the right tools to understand what ammunition is doing when you fire it is an essential part of load development. So what are the tools?
The primary tools needed for load development are those that measure, whether you're trying to squeeze the most accuracy, the highest muzzle velocity, (or lowest in some cases) having the right tools is an essential part. If you are reading this post, you probably already have one of those essential tools: A computer. Computers are very handy for their ability to quickly and easily make complex calculations on large amounts of data. I highly recommend having a spreadsheet type program, like Microsoft Excel, or OpenOffice's Calc application, both have a similar look and feel.
The next necessary tool is a good chronograph, there are many different ones on the market with all kinds of options, under most circumstances, if you have a pen and paper, you don't need the type with the memory and built in calculators and the like, you just need one of the basic ones that when a shot goes over it, it gives you the velocity in your favorite units (I recommend Feet per Second, as it's a little more granular than M/s but it's all a matter of tolerance in the long run).
You will also need some targets, any kind of targets will do, most people use a calibrated target that will have 1" grid squares on it, or something similar. For certain purposes I have a set of transparencies which have group size circles on them, so I can determine if a particular group is 1 MOA, 2 MOA, etc.
Clearly, you will need a firearm that chambers and fires the particular round you are conducting the experiment for, preferably one with repeatable sights, and reasonable accuracy. (Most modern firearms have excellent accuracy)
Some other measuring tools are usually handy to have too, a set of calipers for measuring OAL and group size. A magnifying glass, a tablet and a pen for writing down numbers, sometimes a scientific calculator is handy too.
Sunday, October 30, 2011
Interesting Ammo - 12ga Tracer Ammo
One of the little known facts about being in the gun business is the staggering lack of variety that can sometimes be experienced. In the number of jobs I have performed over the years, nearly all activities can be summed up in about 5-6 different categories, over and over and over again.
For this reason, whenever I get a chance to come across something new, I like to take it apart and learn from it. This time I decided to share this experience with a bit of a photo tour.
 Here is the current object of study. It's a somewhat elderly Winchester 12ga Tracer cartridge. While some eschew such novelties as useless fire danger, projectile designs that allow both the firer and observers to view the path the projectile takes, it has great utility in training, in target acquisition, and for diagnosing problems with the firearm.
Shotgun ammunition fills a very interesting niche legally in the United States, as it is greater than .60 caliber, but is exempt from destructive device classification (part of the NFA/GCA 68). An additional complication is occasionally provided by state laws. Under California law, tracer ammunition is banned, however there is a specific exemption for shotgun tracer ammunition under the California Dangerous Weapons Laws:
I started taking the round apart by the standard method (cutting off the folded portion) and slowly disassembling it. After taking the round apart, I laid out all the components. I used a bit of packing tape to keep the shot from rolling all over the table.

Shown above from left to right, the hull which includes a paper spacer around the powder charge (not shown), the powder charge, a sealing cup, the wad section, the tracer element, the shot cup, and the shot.
The tracer element is ignited by the main powder charge, by way of a hole through the sealing cup and the wad. The wad and tracer assembly is shown in detail here:

The nut underneath the tracer element is just to prop it up and show detail of the vent where the flames will come out. An interesting aspect of this design is the tracer element as a large aluminum ball, should be a close ballistic match to the individual shot pellets. However, obvious problem with this idea is you have a hole in the wad, while this is the only way to ignite the tracer element, it presents an obvious potential problem if the tracer element is blown out of the wad, this could have disastrous effects on the shot pattern.
Here is a photo of the assembled wad and tracer element:

Unfortunately, I only have the one sample, so I won't be able to provide any after-photos of a traced shot column flying through the sky. From the study of this round, and the obvious problems with setting fires, and possibly just not measuring up to the expected performance, make it obvious why this cartridge was never a marketing success. It is also likely this round was significantly more expensive than the other ammunition available at the time. Novel ammunition like this tends to come and go in cycles. I am sure at some point in the future something like this will be available again in the future. If you want some, keep your eyes peeled!
For this reason, whenever I get a chance to come across something new, I like to take it apart and learn from it. This time I decided to share this experience with a bit of a photo tour.

Shotgun ammunition fills a very interesting niche legally in the United States, as it is greater than .60 caliber, but is exempt from destructive device classification (part of the NFA/GCA 68). An additional complication is occasionally provided by state laws. Under California law, tracer ammunition is banned, however there is a specific exemption for shotgun tracer ammunition under the California Dangerous Weapons Laws:
12301. (a) The term "destructive device," as used in this chapter, shall include any of the following weapons: (1) Any projectile containing any explosive or incendiary material or any other chemical substance, including, but not limited to, that which is commonly known as tracer or incendiary ammunition, except tracer ammunition manufactured for use in shotguns.
I started taking the round apart by the standard method (cutting off the folded portion) and slowly disassembling it. After taking the round apart, I laid out all the components. I used a bit of packing tape to keep the shot from rolling all over the table.

Shown above from left to right, the hull which includes a paper spacer around the powder charge (not shown), the powder charge, a sealing cup, the wad section, the tracer element, the shot cup, and the shot.
The tracer element is ignited by the main powder charge, by way of a hole through the sealing cup and the wad. The wad and tracer assembly is shown in detail here:

The nut underneath the tracer element is just to prop it up and show detail of the vent where the flames will come out. An interesting aspect of this design is the tracer element as a large aluminum ball, should be a close ballistic match to the individual shot pellets. However, obvious problem with this idea is you have a hole in the wad, while this is the only way to ignite the tracer element, it presents an obvious potential problem if the tracer element is blown out of the wad, this could have disastrous effects on the shot pattern.
Here is a photo of the assembled wad and tracer element:

Unfortunately, I only have the one sample, so I won't be able to provide any after-photos of a traced shot column flying through the sky. From the study of this round, and the obvious problems with setting fires, and possibly just not measuring up to the expected performance, make it obvious why this cartridge was never a marketing success. It is also likely this round was significantly more expensive than the other ammunition available at the time. Novel ammunition like this tends to come and go in cycles. I am sure at some point in the future something like this will be available again in the future. If you want some, keep your eyes peeled!
Sunday, October 23, 2011
Bullet Seating Woes

Of all the things that simply are far from perfect in the out of the box configuration, one of them is definitely bullet seating punches. Provided you're loading Round-Nose or Flat-Nose bullets, most dies do a pretty good job.
However sometimes, a slightly different Ogive, or some other non-standard configuration makes what should be a straight-forward process a functional nightmare without the right tools. I recently started reloading .40S&W, so I picked up a new set of dies, gathered my materials and got ready to make some new ammo for a shooting trip. As you can see from the picture though, the first few rounds would not pass muster, the problem? Another seating punch that doesn't fit the bullet properly. Instead of carefully centering the bullet in the case mouth, and then supporting both the nose and the ogive as it forces it into the case, this one grabs the bullet by the ogive, cuts into it and then smooshes it in.

This not being my first rodeo (or the first time I've had this issue) I had to make a new punch. So it was over to the lathe, to cut some of the shoulder off the seating punch. Unfortunately, I didn't take a photo before I started cutting. But here it shows a profiled tool cutting the shoulder off, so the projectiles will reach the flat part of the punch and seat properly.
Here's what it looked like after profiling:

Now, if you don't have a lathe, or the ability to cut tools, there are a few other tricks you can use to make a custom punch. The easiest ones (provided you are not using a hollow point bullet) is to put a little bit of wax into the punch, this can be done with a common household candle. Then take a bullet and force it into the punch to form the wax to the bullet profile. Put the punch in the freezer for about 20 minutes to solidify the wax, and then rub the wax surface with a little bit of baby powder to prevent the bullet from sticking. Typically this technique will work for a while before problems start to arise (the wax flaking off, or sticking to a bullet), the best way is to make a custom punch.
Another somewhat less fancy way is to put the punch into a hand drill, or drill press, and using a jewelers file to get inside the punch and cut off what you need to.
Friday, September 2, 2011
Cartridges I Hate to Love
Part of the impetus for writing this blog, is I really like bullets. While many are alterations on an idea, within the confines there seems to be nearly endless variety in how cartridges are designed, put together and perform.
That said, there are some cartridges that strike me as complete anachronisms, but through constant improvement have somehow maintained relevance, in some cases to present day. But despite the performance those updates have brought with them, there are still features of each defy what I normally would think of beautiful about cartridges in general. So I thought I would present a list, talk about some of the history and see if you agree with me.
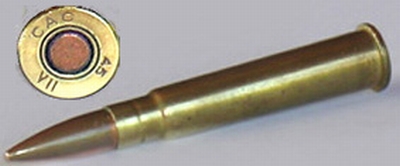 Topping out this list is .303 British. First adopted by the British empire in 1888 for the Lee-Metford it kept the peace serving the British empire from the peak of dominance, through it's sunset. If there was ever a cartridge that in so many ways defied both obsolescence and top marks at a beauty contest this is it. It was first adopted as a black powder cartridge, it's rimmed and has an odd body taper, and it uses a bore diameter shared only with 7.62x54R, 7.62x39, 7.65 Argentine and a select few other cartridges. But this rifle has seen service in peace and in war on every continent on planet earth. If there was a need for guns in space, this cartridge certainly would have gone there at some point.
As I said, this cartridge was first adopted in the Lee Metford in 1888 as a black powder cartridge, however it is better known for the role it played after the Brits dropped the Lee Metford only a few years later in favor of the much updated (and improved) Short Magazine Lee Enfield No.1. This firearm, and the later SMLE No.4 served the empire and commonwealth countries from the time of adoption through two world wars, and was finally dropped in the late 1960's by the British, but is still in service in limited capacity in India. An 80 year active service life for any weapons system is incredible, but more incredible is the changes the .303 Brit round made through this time.
The .303 started as a Black Powder Cartridge, the first small-bore service rifle cartridge, which in the Lee-Metford was fed from a 10 round detachable box magazine that could also be charged with stripper clips. The initial loading (called Mark I) featured a 215gr Round Nose soft point bullet. This was quickly replaced by cordite charges, which while they showed barrel erosion issues, was maintained as the front-line service round as the Mark(s) 3,4 and 5. However it was updated to the Mk 6 after the Hague Convention banned the use of expanding bullets. The Mk 6, served the Empire until WW1, where it was phased out in favor of the Mk VII (7) which used a 174gr Boat Tail Spitzer (Full Metal Jacket) bullet moving about 2200-2400FPS. Some experimentation was done and a Mk 8 was also produced that featured a 175gr Boat Tail Spitzer, however it was intended solely for use in the Vickers Machinegun. The difference between the Mk7 and Mk8 is the bullet of the Mk8 is slightly unbalanced, resulting in a greater spread of bullets against area targets. I found this out the hard way (somewhat) when I was given a large quantity of pulled Mk8 bullets, patterns at 100 yards were about 8".
The Mk7 and Mk8 rounds were standardized before WW2, and remained the standard through the end of service.
While I feel I would be somewhat remiss not to mention the .303 British was also adopted by the japanese during WW2 and was used in direct copies of the Lewis and Vickers machineguns. However, the Japanese never made any changes to either the ammunition or the platforms that used them. So they only receive a footnote here.
I first became aquainted with this cartridge about 5 years ago when I purchased a No4mkIII somewhat accidentally at an auction. Once I realized what I had done, the first thing that stuck in my mind was "Oh great, another rifle I will need to reload for".
The .303 almost universally requires full length sizing of cases to ensure proper headspacing off the cartridge rim. The SMLE, while iconic, has it's locking lugs at the rear of the bolt, and features a cock on close mechanism. To someone who spent many previous years shooting Mausers this is backwards and inferior to the strong locking mechanism present in the Mauser. The additional impression, coming from someone used to shooting the sexy gently tapered rimless cases common in Mauser pattern rifles was negative when faced with a rimmed cartridge.
Despite the initial negative impressions of the rifle, and the ammunition it is a phenomenal rifle and cartridge despite being capable of only modest muzzle velocities around 2200-2300FPS with 150-175gr bullets it is a very fun gun to shoot, the brass butt pad is a little rough on the shoulder but as a rifle of the same generation as my great grandfather, it is every bit as accurate as I am. The cock on close mechanism is makes reloading faster and easier than the heavy extraction/cocking method of the Mauser. And the 10 round magazine capacity definitely contributes to the reasons why the SMLE, and it's ugly cartridge were war winners.
If you ever get a chance, I suggest at least putting a few rounds down range one any of the rifles chambered in .303. It's ugly, but it's a great round and it's service history definitely bears that out.
That said, there are some cartridges that strike me as complete anachronisms, but through constant improvement have somehow maintained relevance, in some cases to present day. But despite the performance those updates have brought with them, there are still features of each defy what I normally would think of beautiful about cartridges in general. So I thought I would present a list, talk about some of the history and see if you agree with me.
As I said, this cartridge was first adopted in the Lee Metford in 1888 as a black powder cartridge, however it is better known for the role it played after the Brits dropped the Lee Metford only a few years later in favor of the much updated (and improved) Short Magazine Lee Enfield No.1. This firearm, and the later SMLE No.4 served the empire and commonwealth countries from the time of adoption through two world wars, and was finally dropped in the late 1960's by the British, but is still in service in limited capacity in India. An 80 year active service life for any weapons system is incredible, but more incredible is the changes the .303 Brit round made through this time.
The .303 started as a Black Powder Cartridge, the first small-bore service rifle cartridge, which in the Lee-Metford was fed from a 10 round detachable box magazine that could also be charged with stripper clips. The initial loading (called Mark I) featured a 215gr Round Nose soft point bullet. This was quickly replaced by cordite charges, which while they showed barrel erosion issues, was maintained as the front-line service round as the Mark(s) 3,4 and 5. However it was updated to the Mk 6 after the Hague Convention banned the use of expanding bullets. The Mk 6, served the Empire until WW1, where it was phased out in favor of the Mk VII (7) which used a 174gr Boat Tail Spitzer (Full Metal Jacket) bullet moving about 2200-2400FPS. Some experimentation was done and a Mk 8 was also produced that featured a 175gr Boat Tail Spitzer, however it was intended solely for use in the Vickers Machinegun. The difference between the Mk7 and Mk8 is the bullet of the Mk8 is slightly unbalanced, resulting in a greater spread of bullets against area targets. I found this out the hard way (somewhat) when I was given a large quantity of pulled Mk8 bullets, patterns at 100 yards were about 8".
The Mk7 and Mk8 rounds were standardized before WW2, and remained the standard through the end of service.
While I feel I would be somewhat remiss not to mention the .303 British was also adopted by the japanese during WW2 and was used in direct copies of the Lewis and Vickers machineguns. However, the Japanese never made any changes to either the ammunition or the platforms that used them. So they only receive a footnote here.
I first became aquainted with this cartridge about 5 years ago when I purchased a No4mkIII somewhat accidentally at an auction. Once I realized what I had done, the first thing that stuck in my mind was "Oh great, another rifle I will need to reload for".
The .303 almost universally requires full length sizing of cases to ensure proper headspacing off the cartridge rim. The SMLE, while iconic, has it's locking lugs at the rear of the bolt, and features a cock on close mechanism. To someone who spent many previous years shooting Mausers this is backwards and inferior to the strong locking mechanism present in the Mauser. The additional impression, coming from someone used to shooting the sexy gently tapered rimless cases common in Mauser pattern rifles was negative when faced with a rimmed cartridge.
Despite the initial negative impressions of the rifle, and the ammunition it is a phenomenal rifle and cartridge despite being capable of only modest muzzle velocities around 2200-2300FPS with 150-175gr bullets it is a very fun gun to shoot, the brass butt pad is a little rough on the shoulder but as a rifle of the same generation as my great grandfather, it is every bit as accurate as I am. The cock on close mechanism is makes reloading faster and easier than the heavy extraction/cocking method of the Mauser. And the 10 round magazine capacity definitely contributes to the reasons why the SMLE, and it's ugly cartridge were war winners.
If you ever get a chance, I suggest at least putting a few rounds down range one any of the rifles chambered in .303. It's ugly, but it's a great round and it's service history definitely bears that out.
Friday, June 24, 2011
Sometimes it is my day
Well, I got the new part for the RCBS priming tool about two weeks ago, I've just been too busy to make any posts, also too busy to take pictures of it. But this one is clearly of higher quality than the original. It looks like it's still made of some kind of cast aluminum alloy, but the machining on the bolt holes is clear and crisp, and there are no indications of inclusions, and best of all, it seems like they beefed it up quite a bit. Way to go RCBS.
Thursday, June 2, 2011
Sometimes it's just not my day
One of the main reasons why I constantly recommend RCBS tools, is the outstanding warranty service they provide. They warranty everything! Including decapping pins, try calling Dillon on his "No BS" warranty and ask them for new decapping pins.
However, one trend I've been noticing more and more with RCBS, is poor build quality on some of their reloading tools. Today was a notable example:

This was after seating about 20 primers into .50BMG casings, that already had reamed primer pockets, and had been chamfered. I was using CCI #35 primers, which are notoriously horrible to seat, and even with the reaming and chamfering, this was no exception. However, I didn't expect my brand new RCBS primer seating tool to crack in half like a lee reloader press trying to reload .308 military casings.
On the upside, and again, why I always recommend RCBS first, I dropped the frame in the mail today after calling RCBS, and they said ship it to them, and I would get a replacement. This is one of those circumstances where I really wish I didn't have to call them about a replacement. Sometimes doing things right the first time is the best way to go, with more and more of RCBS's products being outsourced to China, I am not sure how much longer I will continue to recommend them as the best starting place for most reloaders.
However, one trend I've been noticing more and more with RCBS, is poor build quality on some of their reloading tools. Today was a notable example:

This was after seating about 20 primers into .50BMG casings, that already had reamed primer pockets, and had been chamfered. I was using CCI #35 primers, which are notoriously horrible to seat, and even with the reaming and chamfering, this was no exception. However, I didn't expect my brand new RCBS primer seating tool to crack in half like a lee reloader press trying to reload .308 military casings.
On the upside, and again, why I always recommend RCBS first, I dropped the frame in the mail today after calling RCBS, and they said ship it to them, and I would get a replacement. This is one of those circumstances where I really wish I didn't have to call them about a replacement. Sometimes doing things right the first time is the best way to go, with more and more of RCBS's products being outsourced to China, I am not sure how much longer I will continue to recommend them as the best starting place for most reloaders.
Subscribe to:
Posts (Atom)