Sunday, October 30, 2011

Interesting Ammo - 12ga Tracer Ammo

One of the little known facts about being in the gun business is the staggering lack of variety that can sometimes be experienced. In the number of jobs I have performed over the years, nearly all activities can be summed up in about 5-6 different categories, over and over and over again.

For this reason, whenever I get a chance to come across something new, I like to take it apart and learn from it. This time I decided to share this experience with a bit of a photo tour.

Here is the current object of study. It's a somewhat elderly Winchester 12ga Tracer cartridge. While some eschew such novelties as useless fire danger, projectile designs that allow both the firer and observers to view the path the projectile takes, it has great utility in training, in target acquisition, and for diagnosing problems with the firearm.

Shotgun ammunition fills a very interesting niche legally in the United States, as it is greater than .60 caliber, but is exempt from destructive device classification (part of the NFA/GCA 68). An additional complication is occasionally provided by state laws. Under California law, tracer ammunition is banned, however there is a specific exemption for shotgun tracer ammunition under the California Dangerous Weapons Laws:

12301. (a) The term "destructive device," as used in this chapter, shall include any of the following weapons: (1) Any projectile containing any explosive or incendiary material or any other chemical substance, including, but not limited to, that which is commonly known as tracer or incendiary ammunition, except tracer ammunition manufactured for use in shotguns.

I started taking the round apart by the standard method (cutting off the folded portion) and slowly disassembling it. After taking the round apart, I laid out all the components. I used a bit of packing tape to keep the shot from rolling all over the table.


Shown above from left to right, the hull which includes a paper spacer around the powder charge (not shown), the powder charge, a sealing cup, the wad section, the tracer element, the shot cup, and the shot.

The tracer element is ignited by the main powder charge, by way of a hole through the sealing cup and the wad. The wad and tracer assembly is shown in detail here:

The nut underneath the tracer element is just to prop it up and show detail of the vent where the flames will come out. An interesting aspect of this design is the tracer element as a large aluminum ball, should be a close ballistic match to the individual shot pellets. However, obvious problem with this idea is you have a hole in the wad, while this is the only way to ignite the tracer element, it presents an obvious potential problem if the tracer element is blown out of the wad, this could have disastrous effects on the shot pattern.

Here is a photo of the assembled wad and tracer element:


Unfortunately, I only have the one sample, so I won't be able to provide any after-photos of a traced shot column flying through the sky. From the study of this round, and the obvious problems with setting fires, and possibly just not measuring up to the expected performance, make it obvious why this cartridge was never a marketing success. It is also likely this round was significantly more expensive than the other ammunition available at the time. Novel ammunition like this tends to come and go in cycles. I am sure at some point in the future something like this will be available again in the future. If you want some, keep your eyes peeled!

Sunday, October 23, 2011

Bullet Seating Woes


Of all the things that simply are far from perfect in the out of the box configuration, one of them is definitely bullet seating punches. Provided you're loading Round-Nose or Flat-Nose bullets, most dies do a pretty good job.

However sometimes, a slightly different Ogive, or some other non-standard configuration makes what should be a straight-forward process a functional nightmare without the right tools. I recently started reloading .40S&W, so I picked up a new set of dies, gathered my materials and got ready to make some new ammo for a shooting trip. As you can see from the picture though, the first few rounds would not pass muster, the problem? Another seating punch that doesn't fit the bullet properly. Instead of carefully centering the bullet in the case mouth, and then supporting both the nose and the ogive as it forces it into the case, this one grabs the bullet by the ogive, cuts into it and then smooshes it in.


This not being my first rodeo (or the first time I've had this issue) I had to make a new punch. So it was over to the lathe, to cut some of the shoulder off the seating punch. Unfortunately, I didn't take a photo before I started cutting. But here it shows a profiled tool cutting the shoulder off, so the projectiles will reach the flat part of the punch and seat properly.

Here's what it looked like after profiling:


Now, if you don't have a lathe, or the ability to cut tools, there are a few other tricks you can use to make a custom punch. The easiest ones (provided you are not using a hollow point bullet) is to put a little bit of wax into the punch, this can be done with a common household candle. Then take a bullet and force it into the punch to form the wax to the bullet profile. Put the punch in the freezer for about 20 minutes to solidify the wax, and then rub the wax surface with a little bit of baby powder to prevent the bullet from sticking. Typically this technique will work for a while before problems start to arise (the wax flaking off, or sticking to a bullet), the best way is to make a custom punch.

Another somewhat less fancy way is to put the punch into a hand drill, or drill press, and using a jewelers file to get inside the punch and cut off what you need to.

Friday, September 2, 2011

Cartridges I Hate to Love

Part of the impetus for writing this blog, is I really like bullets. While many are alterations on an idea, within the confines there seems to be nearly endless variety in how cartridges are designed, put together and perform.

That said, there are some cartridges that strike me as complete anachronisms, but through constant improvement have somehow maintained relevance, in some cases to present day. But despite the performance those updates have brought with them, there are still features of each defy what I normally would think of beautiful about cartridges in general. So I thought I would present a list, talk about some of the history and see if you agree with me.

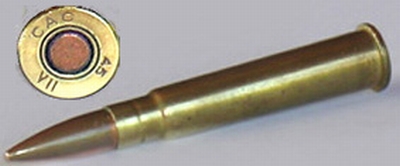
Topping out this list is .303 British. First adopted by the British empire in 1888 for the Lee-Metford it kept the peace serving the British empire from the peak of dominance, through it's sunset. If there was ever a cartridge that in so many ways defied both obsolescence and top marks at a beauty contest this is it. It was first adopted as a black powder cartridge, it's rimmed and has an odd body taper, and it uses a bore diameter shared only with 7.62x54R, 7.62x39, 7.65 Argentine and a select few other cartridges. But this rifle has seen service in peace and in war on every continent on planet earth. If there was a need for guns in space, this cartridge certainly would have gone there at some point.

As I said, this cartridge was first adopted in the Lee Metford in 1888 as a black powder cartridge, however it is better known for the role it played after the Brits dropped the Lee Metford only a few years later in favor of the much updated (and improved) Short Magazine Lee Enfield No.1. This firearm, and the later SMLE No.4 served the empire and commonwealth countries from the time of adoption through two world wars, and was finally dropped in the late 1960's by the British, but is still in service in limited capacity in India. An 80 year active service life for any weapons system is incredible, but more incredible is the changes the .303 Brit round made through this time.

The .303 started as a Black Powder Cartridge, the first small-bore service rifle cartridge, which in the Lee-Metford was fed from a 10 round detachable box magazine that could also be charged with stripper clips. The initial loading (called Mark I) featured a 215gr Round Nose soft point bullet. This was quickly replaced by cordite charges, which while they showed barrel erosion issues, was maintained as the front-line service round as the Mark(s) 3,4 and 5. However it was updated to the Mk 6 after the Hague Convention banned the use of expanding bullets. The Mk 6, served the Empire until WW1, where it was phased out in favor of the Mk VII (7) which used a 174gr Boat Tail Spitzer (Full Metal Jacket) bullet moving about 2200-2400FPS. Some experimentation was done and a Mk 8 was also produced that featured a 175gr Boat Tail Spitzer, however it was intended solely for use in the Vickers Machinegun. The difference between the Mk7 and Mk8 is the bullet of the Mk8 is slightly unbalanced, resulting in a greater spread of bullets against area targets. I found this out the hard way (somewhat) when I was given a large quantity of pulled Mk8 bullets, patterns at 100 yards were about 8".

The Mk7 and Mk8 rounds were standardized before WW2, and remained the standard through the end of service.

While I feel I would be somewhat remiss not to mention the .303 British was also adopted by the japanese during WW2 and was used in direct copies of the Lewis and Vickers machineguns. However, the Japanese never made any changes to either the ammunition or the platforms that used them. So they only receive a footnote here.

I first became aquainted with this cartridge about 5 years ago when I purchased a No4mkIII somewhat accidentally at an auction. Once I realized what I had done, the first thing that stuck in my mind was "Oh great, another rifle I will need to reload for".

The .303 almost universally requires full length sizing of cases to ensure proper headspacing off the cartridge rim. The SMLE, while iconic, has it's locking lugs at the rear of the bolt, and features a cock on close mechanism. To someone who spent many previous years shooting Mausers this is backwards and inferior to the strong locking mechanism present in the Mauser. The additional impression, coming from someone used to shooting the sexy gently tapered rimless cases common in Mauser pattern rifles was negative when faced with a rimmed cartridge.

Despite the initial negative impressions of the rifle, and the ammunition it is a phenomenal rifle and cartridge despite being capable of only modest muzzle velocities around 2200-2300FPS with 150-175gr bullets it is a very fun gun to shoot, the brass butt pad is a little rough on the shoulder but as a rifle of the same generation as my great grandfather, it is every bit as accurate as I am. The cock on close mechanism is makes reloading faster and easier than the heavy extraction/cocking method of the Mauser. And the 10 round magazine capacity definitely contributes to the reasons why the SMLE, and it's ugly cartridge were war winners.

If you ever get a chance, I suggest at least putting a few rounds down range one any of the rifles chambered in .303. It's ugly, but it's a great round and it's service history definitely bears that out.

Friday, June 24, 2011

Sometimes it is my day

Well, I got the new part for the RCBS priming tool about two weeks ago, I've just been too busy to make any posts, also too busy to take pictures of it. But this one is clearly of higher quality than the original. It looks like it's still made of some kind of cast aluminum alloy, but the machining on the bolt holes is clear and crisp, and there are no indications of inclusions, and best of all, it seems like they beefed it up quite a bit. Way to go RCBS.

Thursday, June 2, 2011

Sometimes it's just not my day

One of the main reasons why I constantly recommend RCBS tools, is the outstanding warranty service they provide. They warranty everything! Including decapping pins, try calling Dillon on his "No BS" warranty and ask them for new decapping pins.

However, one trend I've been noticing more and more with RCBS, is poor build quality on some of their reloading tools. Today was a notable example:


This was after seating about 20 primers into .50BMG casings, that already had reamed primer pockets, and had been chamfered. I was using CCI #35 primers, which are notoriously horrible to seat, and even with the reaming and chamfering, this was no exception. However, I didn't expect my brand new RCBS primer seating tool to crack in half like a lee reloader press trying to reload .308 military casings.

On the upside, and again, why I always recommend RCBS first, I dropped the frame in the mail today after calling RCBS, and they said ship it to them, and I would get a replacement. This is one of those circumstances where I really wish I didn't have to call them about a replacement. Sometimes doing things right the first time is the best way to go, with more and more of RCBS's products being outsourced to China, I am not sure how much longer I will continue to recommend them as the best starting place for most reloaders.

Saturday, May 7, 2011

Reloading - Where to Start

So I realized tonight that I don't listen to myself enough. Rather than getting deep in the weeds on that, let me instead tell you what I wasn't listening to myself about: Which reloading press a newbie should start off with.

I suppose I could be a bit biographical regarding this topic. I started reloading when I was 12. After a long summer of working as a bus boy at my aunt's diner, I had saved up quite a bit of cash, and I had but one thing on my list of things I wanted, an AR-15. Well, after spending some of my hard earned money and $600 later, I now had the gun I had wanted since about age 9. (I should probably point out, my dad took my money, purchased the gun, and kept it locked up except when we were going to the range. I didn't really come from a family of shooters, and except for a little .22 I inherited from my grandfather we had no other guns in the house previous to this.)

I was now beset with a new problem, a gun I couldn't really afford the ammo for it. So with the suggestion of my shooting coach (I belonged to a Jr Marksmanship Program at the time) I got into reloading. I ordered the cheapest press I could find, a lee reloader (It was about $12 at the time) and RCBS was selling a low cost die set for $17, I then purchased some bullets, some primers, some powder (again, my dad made the purchases, and kept it locked up unless he was supervising me) a priming tool, and I was off to the races. It took me a while to really learn what I was doing, first, due to lousy powder selection I bought a powder that was too fast to reliably cycle my beloved AR, and had a number of other issues. Eventually, I learned a lot, came up with some very good and accurate loads and won many service rifle competitions through my teen years with that gun.

In that time, my reloading kit grew and grew, equipment got replaced with better and more expensive, higher quality, and faster to use tools. So to circle back, where should the newbie start?

Honestly, reloading is a fun and rewarding hobby, but it's one best reserved for those with lots of patience, and those that take pride in working with their hands. Initially, the thoughts of getting into reloading only to save money will quickly lead to impatience, poorly reloaded ammo. At the worst this hobby can just cause you to shoot worse and suck all your money out of the bank, at worst it could severely injure or maim you for life.

So where to start? Because this hobby is about working with your hands, start slow. The Lee Reloader press I started out with back in the early 90's still costs less than $30, and will easily reload most pistol and medium rifle cases (for those looking to do .308 or bigger rounds, I HIGHLY recommend the RCBS Partner press, as the Lee Reloader press will rather quickly snap in two, as mine did). Now the dies, if there is anything that is important to producing good quality ammo, it's the dies, I recommend splurging on this. Lee is crap, RCBS is good, Redding is better. You will also need a shellholder, Lee sells a set of 12 shell holders for $20, buy that, it will fit most calibers you're likely to load. Buy some kind of press mounted priming tool, Lee sells the ram prime which is good, be sure to start slow and only load one primer at a time until you know what you're doing, a chain detonation could severely injure you. And now the two most important tools, buy a HIGH QUALITY scale, I recommend people start with a balance beam, as it doesn't need to be recalibrated constantly, and batteries don't die. And a set of dial calipers. The last thing you will need is a reloading manual, read it over and over several times before you start. If you're not sure what you're doing ask someone with some experience. Ask me, ask someone on a forum. When it comes to doing dangerous things forewarned is forearmed.

Add some shell casings, bullets, primers and powder and you're ready to reload. There are some other things you'll need, like case lube (for rifle cases), maybe a case tumbler a case trimmer. But above covers the basics.

After a few years, and a few thousand rounds, you may think about stepping up to a progressive press. I highly recommend the Hornady LNL to the exclusion of Dillon 550/650's.

Thursday, April 28, 2011

Case Processing - Made (sorta) Easy

Case processing is the foundation of all reloading. Whether you do it one at a time, or all at once, this is where both accuracy and safety start. First, a little review.

Cleaning brass can be broken down into a few different types generally, washing and tumbling are the two main ways. Since I've already touched on the nuances of how to clean, lets talk about when to clean.

When I get some fired brass, before I can turn it into ammunition, I have to process it. Processing involves a few different steps, which vary depending on type and caliber. Regardless of what it is, the first step I always take is washing the brass. The main reason for this, is dirty brass is full of dirt (yea, a little tautological) which will translate into dirt in my reloading machine, which means either cleaning the machine, or making crappy ammo. Since crappy ammo is not an option, either clean the brass, or clean the machine. Cleaning the machine is a pain, so I clean the brass. Typically, I do this by washing the brass. As it removes dirt and oils, but doesn't require the time of tumbling.

After the brass has been washed, if it's rifle brass I lube it up usually using lanolin spray lube. There are many varieties, Dillon sells the most common version, but you can make it at home (more on that later). Since I mostly use progressive presses, I will set the head up usually in the following order:

* Decapping die
* Sizing die (small base)
* Expanding die
* Trim Die (Dillon RT1200 case trimmer)

The reason I separate out the steps this way, is many progressive presses (the Dillon 1050 especially) have very little mechanical advantage except near the bottom of the stroke. So the typical expander configuration will make for very jerky handling which will slow you down. Frequently I will use a full length sizing die for my decapping die, and have it backed off a bit so it doesn't engage the case. This helps center the case and reduces crushed cases.

For pistol case processing, this is substantially simpler. Size and decap all the brass with a carbide sizing die. For brass that's cleaner, I will skip the initial washing step, for dirty brass, it gets washed.

So now you have sized and decapped brass. Time for cleaning again! Wash it (especially the rifle brass to remove case lube) and dry. Followed by tumbling (if you wet tumble, be sure to dry it).

After this, your reloading should be just like running new brass through your machine. If you are running a progressive, this will greatly improve reliability of the machine and through put. One of the chief benefits to processing brass this way, is a higher quality product when done. You don't have to tumble live ammo trying to get lube off the brass (this always makes things dirtier), in most cases brass processed this way will look as good as new ammo if you do it right.